If your users have started seeing new security warnings every time they open an .rdp file, you are not alone. Microsoft’s April 2026 cumulative updates — KB5083769 for Windows 11 and KB5082200 for Windows 10 has introduced significant new protections for Remote Desktop Protocol connection files. Changes that are already catching IT teams off guard. The core of the update addresses CVE-2026-26151. CVE-2026-26151 is a remote desktop spoofing vulnerability that has been actively exploited on the Internet. Most notably, the Russian state-sponsored hacking group APT29 (also known as Cozy Bear) was caught distributing weaponised .rdp files to steal credentials and data from victims . These malicious .rdp files where often executed with nothing more than a convincing phishing email. Microsoft’s response has been to fundamentally change how unsigned .rdp files are handled in Windows. Ultimately Microsoft now insists you digitally sign your RDP files.
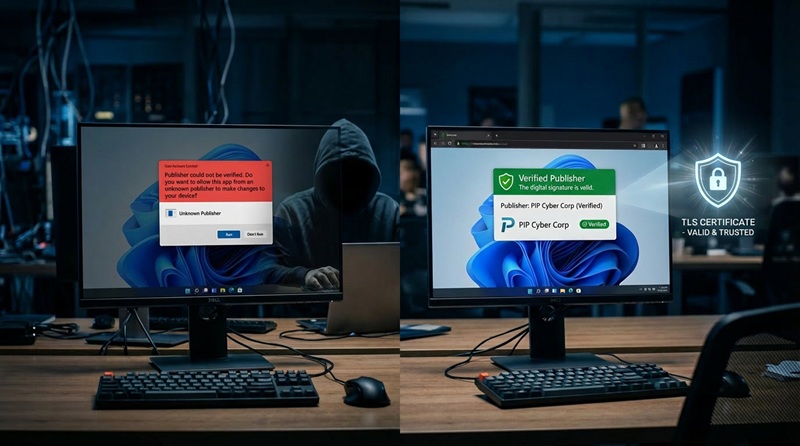
Under the new behaviour, any .rdp file that has not been digitally signed will trigger a “Caution: Unknown remote connection” warning dialog every single time it is opened. This replaces the old “Don’t ask me again” checkbox which has now gone. There is no way to suppress this warning for unsigned files. Additionally, all drive and clipboard redirections requested by unsigned .rdp files are now blocked by default. This means users must manually re-enable them on each connection. For organisations distributing .rdp shortcuts to staff or clients, this is a serious usability problem.
The fix is straightforward, you must sign your .rdp files with a code signing certificate. A signed file displays the publisher’s verified name in the connection dialog, replaces the red caution
banner with a named publisher prompt and allows redirections to work as configured. Our guide walks you through the entire process – from obtaining the right certificate to signing
your files and deploying them across your organisation. Of course if you need a hand we are only a phone call or email away.
Table of Contents
- Why Sign RDP Files?
- Prerequisites
- Understanding Your Certificate Options
- Option A: Self-Signed Certificate (Internal/Testing)
- Option B: Enterprise CA Certificate (Domain Environment)
- Option C: Commercial Code Signing Certificate (Public-Facing)
- Installing and Locating Your Certificate
- Signing the RDP File with rdpsign.exe
- Verifying the Signature
- Distributing Signed RDP Files
- Group Policy Configuration
- Troubleshooting Common Issues
1. Why Sign RDP Files?
Under the latest Windows 11 and Windows 10 update, when an end user double-clicks an unsigned .rdp file, Windows displays a prominent warning:
“The publisher of this remote connection can’t be identified. Do you want to connect anyway?”
This warning appears in red and causes hesitation — particularly among non-technical users. Worse, it provides no protection against a malicious .rdp file that has been swapped out or tampered with. At the same time all locally shared resources are reset and must by manually reactivated.
Signing an .rdp file provides:
- Identity verification — Users can confirm the file came from your organisation and has not been substituted.
- Tamper detection — Any modification to a signed file invalidates the signature and returned it to its red flagged state.
- A trusted experience — A valid signature replaces the red warning with a green trusted-publisher banner whereby it is easy to see that each client is compliant.
- Compliance — Current Australian security frameworks such as ASD Essential Eight an ISO 27001 require signed executables and configuration files distributed to end users.
2. Prerequisites
Before you begin, ensure the following are in place:
- Windows machine with administrator rights (Windows 10/11 or Windows Server 2016+)
rdpsign.exe— This executable is included in all modern Windows installations atC:\Windows\System32\rdpsign.exe- PowerShell running as Administrator
- An
.rdpfile that is fully configured that you want to sign - One of the certificates described in Section 3
To confirm rdpsign.exe is installed and available, open PowerShell and run:
Get-Command rdpsign.exeYou should see its path returned. If not, confirm you are on a supported Windows version.
3. Understanding Your Certificate Options
There are three certificate sources, all with different security levels, suited to different scenarios and fees :
| Option | Best For | Trust | Cost |
|---|---|---|---|
| Self-Signed Certificates | Internal testing, lab environments | Machines you manually trust it on | Free |
| Enterprise CA (Certificate Authority) | Corporate environments with Active Directory | All domain-joined machines automatically | Free (if CA exists) |
| Commercial CA (Certificate Authority) | Public-facing or mixed environments | All Windows machines out of the box | Paid annually |
Choose the option that best matches your environment, most Australian organisations, including small businesses will require an Enterprise or Commercial CA. When decided, follow the corresponding section below.
4. Option A: Self-Signed Certificate (Internal/Testing)
A self-signed certificate is the quickest way to get started. It is only trusted on machines where you explicitly install it — making it suitable for testing or tightly controlled environments.
Step 1 — Generate the Certificate
Open PowerShell as Administrator and run:
$cert = New-SelfSignedCertificate `
    -Type CodeSigningCert `
    -Subject "CN=RDP Publisher, O=Your Organisation, C=AU" `
    -KeyUsage DigitalSignature `
    -FriendlyName "RDP Signing Certificate" `
    -CertStoreLocation "Cert:\LocalMachine\My" `
    -NotAfter (Get-Date).AddYears(3)
Adjust the -Subject value to reflect your organisation’s name, e.g. “PIP Total I Solutions”.
Step 2 — Export the Certificate (for Distribution)
Export the public certificate so you can install it on client machines:
Export-Certificate `
    -Cert $cert `
    -FilePath "C:\Certs\rdp-signing-public.cer"
To also export with the private key (for use on other signing machines). Export the certificate as PFX:
$password = ConvertTo-SecureString -String "YourStrongPassword!" -Force -AsPlainText

Export-PfxCertificate `
    -Cert $cert `
    -FilePath "C:\Certs\rdp-signing.pfx" `
    -Password $password
Store the .pfx securely as it contains the private key.
Step 3 — Trust the Certificate on Client Machines
For the signed .rdp file to show as trusted on a client, the public certificate must be in the client’s Trusted Publishers and Trusted Root Certification Authorities stores. To achieve this you must install it within each users certificate store.
On each client machine (or via Group Policy — see Section 11):
# Import to Trusted Root CA
Import-Certificate `
    -FilePath "C:\Certs\rdp-signing-public.cer" `
    -CertStoreLocation "Cert:\LocalMachine\Root"

# Import to Trusted Publishers
Import-Certificate `
    -FilePath "C:\Certs\rdp-signing-public.cer" `
    -CertStoreLocation "Cert:\LocalMachine\TrustedPublisher"
5. Option B: Enterprise CA Certificate (Domain Environment)
If your organisation runs Active Directory Certificate Services (AD CS), you can request a code signing certificate from your internal CA. All domain-joined machines will automatically trust it.
Step 1 — Request the Certificate via MMC
- Press
Win + R, typemmc, press Enter. - Go to File > Add/Remove Snap-in.
- Add Certificates, choose Computer account, then Local computer.
- Navigate to Certificates (Local Computer) > Personal > Certificates.
- Right-click Certificates, select All Tasks > Request New Certificate.
- Follow the Certificate Enrollment wizard.
- Select a Code Signing template (your CA admin may need to enable this template).
- Complete the request and click Enroll.
Step 2 — Request via PowerShell (Alternative)
Get-Certificate `
    -Template "CodeSigning" `
    -CertStoreLocation "Cert:\LocalMachine\My"
Replace "CodeSigning" with the exact template name your CA administrator has configured.
Step 3 — Verify the Certificate is Installed
Get-ChildItem Cert:\LocalMachine\My | Where-Object { $_.EnhancedKeyUsageList -match "Code Signing" }6. Option C: Commercial Code Signing Certificate (Public-Facing)
For RDP files distributed to external users or mixed environments, we recommend you purchase a code signing certificate from a trusted public Certificate Authority. Popular providers include:
- DigiCert — digicert.com
- Sectigo (formerly Comodo) — sectigo.com
- GlobalSign — globalsign.com
- Entrust — entrust.com
PIP is a registered reseller of all certificates, and can provide a discount to retails costs, please contact us for further information.
What to Order
Request a standard code signing certificate. Note: If you purchase an EV/Extended Validation certificate this will require a hardware token which adds complexity to the signing workflow. This will complicate your setup and signing, though an EV provides the highest trust level and may be worth considering for high-security deployments. Check with PIP if unsure of what type of certificate you need.
Validation Process
Commercial CAs require identity verification before issuing. This typically involves:
- Submitting your organisation’s legal name and contact details.
- The CA calling a verified phone number to confirm the request.
- Providing incorporation documents or DUNS number in some cases.
Allow 2–5 business days for validation.
Receiving Your Certificate
The CA will provide one of:
- A
.pfxfile (certificate + private key bundled) - A
.cerfile with instructions to retrieve the full chain
Import the .pfx file into the Personal certificate store on your signing machine:
$password = ConvertTo-SecureString -String "YourPfxPassword" -Force -AsPlainText

Import-PfxCertificate `
    -FilePath "C:\Certs\commercial-codesigning.pfx" `
    -CertStoreLocation "Cert:\LocalMachine\My" `
    -Password $password
7. Installing and Locating Your Certificate
Regardless of which option you chose, you will need the certificate thumbprint to use with rdpsign.exe.
Find Your Certificate’s Thumbprint
Get-ChildItem Cert:\LocalMachine\My | `
    Where-Object { $_.EnhancedKeyUsageList -match "Code Signing" } | `
    Select-Object Subject, Thumbprint, NotAfter
Example output:
Subject                                     Thumbprint                               NotAfter
-------                                     ----------                               --------
CN=RDP Publisher, O=Your Organisation...    A1B2C3D4E5F6A1B2C3D4E5F6A1B2C3D4E5F6A1B2 1/04/2029 12:00:00 AM
Copy the Thumbprint value — you will need it in the next step. Remove any spaces if present.
Verify the Certificate is Valid for Code Signing
$thumbprint = "A1B2C3D4E5F6A1B2C3D4E5F6A1B2C3D4E5F6A1B2"
$cert = Get-Item "Cert:\LocalMachine\My\$thumbprint"

# Check Enhanced Key Usage includes Code Signing (OID 1.3.6.1.5.5.7.3.3)
$cert.EnhancedKeyUsageList
You should see Code Signing in the output. If the EKU list is empty or only shows other purposes, the certificate is not suitable for signing.
8. Signing the RDP File with rdpsign.exe
rdpsign.exe is a Windows built-in command-line tool specifically designed to sign your .rdp files. It is located at C:\Windows\System32\rdpsign.exe.
Basic Syntax
rdpsign.exe /sha256 <thumbprint> <path-to-rdp-file>Step 1 — Prepare Your RDP File
Ensure your .rdp file is complete and configured exactly as you want it. Changing the file after signing will invalidate the signature and you will have to resign the app.
Example file: C:\RDP\MyServer.rdp
Step 2 — Sign the File
Open PowerShell or Command Prompt as Administrator and run:
rdpsign.exe /sha256 A1B2C3D4E5F6A1B2C3D4E5F6A1B2C3D4E5F6A1B2 "C:\RDP\MyServer.rdp"Replace the thumbprint and file path with your own values.
Successful output:
Successfully signed: C:\RDP\MyServer.rdpSigning Multiple RDP Files at Once
To sign all .rdp files in a given directory:
for %f in ("C:\RDP\*.rdp") do rdpsign.exe /sha256 A1B2C3D4E5F6A1B2C3D4E5F6A1B2C3D4E5F6A1B2 "%f"Or in PowerShell:
$thumbprint = "A1B2C3D4E5F6A1B2C3D4E5F6A1B2C3D4E5F6A1B2"

Get-ChildItem "C:\RDP\*.rdp" | ForEach-Object {
    & rdpsign.exe /sha256 $thumbprint $_.FullName
    Write-Host "Signed: $($_.Name)"
}
What rdpsign.exe Does to the File
rdpsign.exe appends a signature:s: line to the .rdp file containing the Base64-encoded signature. It also adds a signscope:s: line listing the fields that are covered by the signature. If either of these fields is altered after signing, the signature becomes invalid.
9. Verifying the Signature
Visual Verification
Double-click the signed .rdp file. If the certificate is trusted on this machine, the Remote Desktop Connection dialog will display a green banner:
“The identity of the remote computer has been verified.”
If the certificate is not yet trusted, you will see a yellow warning — the publisher name will still be shown, but you will need to distribute the certificate to fully suppress the warning.
Command-Line Verification
You can inspect the signature data within the .rdp file directly:
$content = Get-Content "C:\RDP\MyServer.rdp"
$content | Where-Object { $_ -match "^signature" -or $_ -match "^signscope" }
A signed file will contain entries like:
signscope:s:full address:s:...
signature:s:AAAAAAAABBBBBBBB....(long Base64 string)
Check the Signing Certificate
To see which certificate was used to sign a file, you can parse the signature using PowerShell and the .NET X509Certificate2 class, or simply open the file in a text editor and cross-reference the signature:s: field with your certificate’s thumbprint via CertUtil:
certutil -verify "C:\RDP\MyServer.rdp"Note: certutil -verify works on certificates and CRL files directly; for .rdp signature inspection, the primary verification method is the visual check when opening the file, or checking for the signature:s: field presence.
10. Distributing Signed RDP Files
What to Distribute
When distributing signed rdp files, you need to distribute two things to end users:
- The signed
.rdpfile — the actual connection shortcut / rdp app itself. - The signing certificate (public key only,
.cerfile). This is only required if using a self-signed or enterprise CA certificate that is not already trusted on client machines. Commercial CA certificates do not require separate distribution.
Distribution Methods
Email / File share: For small teams, simply email the .rdp file and include instructions for installing the certificate if needed. Some email clients will block rdp files, so it is suggested you zip them before hand.
Intranet / SharePoint: Host the .rdp file on a DMZ or trusted internal site. Users download and run it directly.
Software deployment tools: For MSP’s or Enterprises, use SCCM, RMM, Intune or similar tools to push the .rdp file and certificate to managed devices simultaneously.
Web download with HTTPS: If hosting on a web server, ensure the download is served over HTTPS to prevent man-in-the-middle substitution of the file in transit and host it on a random URL.
11. Group Policy Configuration
Microsoft’s Group Policy allows you to automatically distribute your signing certificate to all domain machines and configure RDP trust settings centrally. This eliminate system administrators from having to manually install the certificate on each machine.
Distributing the Certificate via Group Policy
- Open Group Policy Management Console (
gpmc.msc). - Create or edit a GPO linked to the appropriate OU or domain.
- Navigate to:
Computer Configuration > Windows Settings > Security Settings > Public Key Policies > Trusted Publishers - Right-click Trusted Publishers, select Import, and import your
.cerfile. - Repeat for Trusted Root Certification Authorities if using a self-signed certificate.
- Link the GPO and allow it to propagate (or force with
gpupdate /forceon clients).
Configuring RDP Warning Behaviour via Group Policy
You can also configure how Windows handles unsigned or untrusted .rdp files:
Navigate to:Computer Configuration > Administrative Templates > Windows Components > Remote Desktop Services > Remote Desktop Connection Client
Relevant settings:
| Setting | Recommended Value |
|---|---|
| Specify SHA1 thumbprints of certificates representing trusted .rdp publishers | Add your certificate thumbprint here |
| Do not allow passwords to be saved | Enabled (security best practice) |
| Prompt for credentials on the client computer | Enabled |
Adding the thumbprint to the trusted publishers policy means even before the certificate propagates via PKI, machines will trust .rdp files signed by that specific certificate.
12. Troubleshooting Common Issues
“Access denied” when running rdpsign.exe
Cause: rdpsign.exe requires administrator privileges and access to the private key.
Fix: Run PowerShell or Command Prompt as Administrator. Also verify the certificate’s private key permissions:
$thumbprint = "A1B2C3D4E5F6A1B2C3D4E5F6A1B2C3D4E5F6A1B2"
$cert = Get-Item "Cert:\LocalMachine\My\$thumbprint"
$rsaKey = [System.Security.Cryptography.X509Certificates.RSACertificateExtensions]::GetRSAPrivateKey($cert)
If the key is stored in a hardware token or TPM, ensure the signing session has access.
“The certificate is not valid for code signing”
Cause: The certificate’s Enhanced Key Usage (EKU) does not include Code Signing (OID 1.3.6.1.5.5.7.3.3).
Fix: Obtain a certificate specifically issued with the Code Signing EKU. A standard SSL/TLS certificate will not work.
Signature shows as “Unknown Publisher” on client
Cause: The signing certificate (or its CA chain) is not in the client’s Trusted Publishers or Trusted Root store.
Fix: Distribute and install the public certificate on client machines (see Section 10 and 11). For enterprise environments, use Group Policy. For self-signed certificates, this step is mandatory.
File appears unsigned after signing
Cause: The file was modified after signing (even a single character change invalidates the signature), or the signing process did not complete successfully.
Fix: Re-sign the file. Ensure no other process is modifying it. Confirm rdpsign.exe output shows Successfully signed.
rdpsign.exe exits with no output or an error code
Cause: May indicate a corrupted .rdp file, an unsupported file format, or a certificate store issue.
Fix:
- Verify the
.rdpfile opens correctly in Remote Desktop Connection before signing. - Confirm the thumbprint has no spaces (remove them if copied from MMC).
- Try with the
-lflag for logging:rdpsign.exe /sha256 <thumbprint> /l "C:\rdpsign.log" "C:\RDP\MyServer.rdp"
Summary
Signing your .rdp files is a straightforward process once your certificate is in place:
- Acquire a certificate — self-signed, enterprise CA, or commercial CA depending on your audience.
- Install it in
Cert:\LocalMachine\Myon your signing machine. - Note the thumbprint from
Get-ChildItem Cert:\LocalMachine\My. - Run
rdpsign.exe /sha256 <thumbprint> <file.rdp>to sign. - Distribute the signed
.rdpfile and (if needed) the public certificate to clients. - Use Group Policy for enterprise-wide trust and certificate deployment.
Once complete, your users will see a trusted green banner instead of a red warning — and you will have tamper-evident RDP connections that verify your organisation as the publisher.