Due to changes implemented by Microsoft to the Autodiscover service, Outlook and Windows are now configured to connect to Microsoft Office 365 instead of your on-premise Exchange server or our PIP private hosted Exchange server. This new update or new feature creates serious problems for system administrators and IT professionals.
The Autodiscover service informs your Microsoft Outlook Client where your mailbox resides and automatically configures the Microsoft exchange account settings. When you start your Email Client, it checks for a series of potential configurations. Currently, when you open Outlook, the first place it will check for your Email address is at Windows 365. If your Microsoft 365 Email account is discoverable, Outlook will connect to it and assume this is your Email address, halting the Autodiscover process before discovering your actual Email address. Therefore, if you operate in a hybrid environment with the same email address for Microsoft’s exchange online and your external Email server, Outlook will default to the Office 365 account.
In this scenario, Outlook will not display a meaningful error message but will continually prompt you for your credentials. At this point, it is attempting to authenticate you on your Windows 365 Account. For added complexity, if your logon credentials for your Microsoft Account and your private Email service are identical, you may successfully set up your Email Client only to find connectivity issues, whereby, you neither synchronize any Email nor receive or send new Emails.
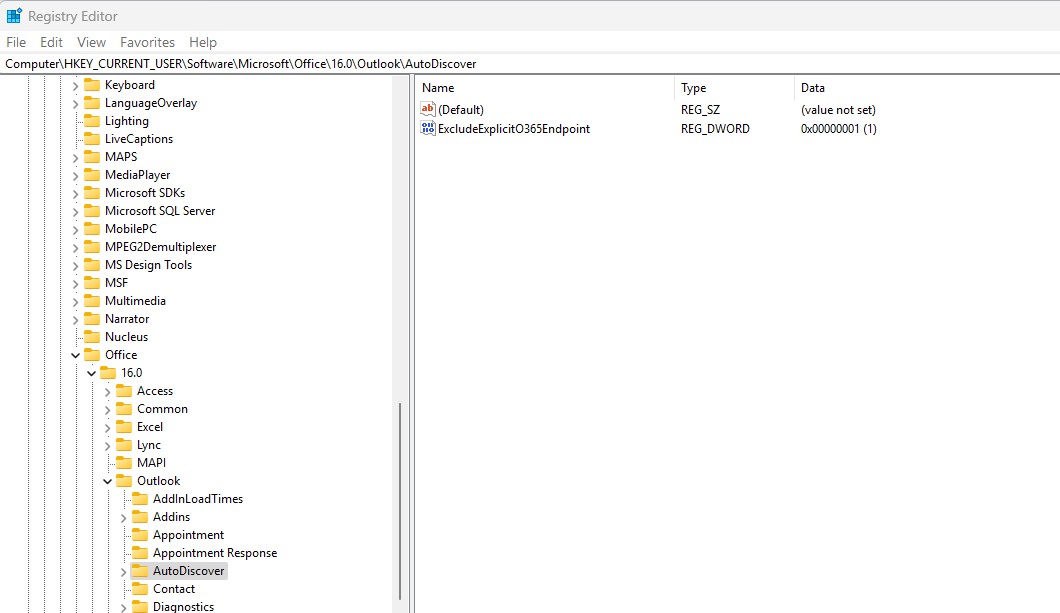
To resolve this issue, you can modify your registry settings to exclude Office 365 as an Autodiscover endpoint by adding the `excludeexplicito365endpoint` key to your registry under the Autodiscover container. This adjustment will force Outlook to bypass the Office 365 check and connect directly to your own Email Servers.
This change will not result in the deletion of any emails, nor will it remove, alter, or delete any OST (Offline Storage Table) files or PST (Personal Storage Table) archives. Your emails, including all messages in your inbox, sent items, drafts, and other folders, will remain completely intact. Additionally, the OST file, which stores a local copy of your mailbox data for offline access, will be preserved without any modifications. Similarly, your PST archives, which contain older emails and other important data stored for long-term access, will remain untouched and fully accessible. Rest assured, all your email data and associated files will be safe and unaffected by this change.
However, please exercise caution when modifying the Registry, as any incorrect changes could potentially impair your computer’s functionality. If an any doubt contact our technical support.
To prevent Outlook from automatically connecting to an Office 365 account, it is best practice to create a registry entry that excludes your Outlook from detecting Office 365. Possible solutions are described in the two following methods –
Alter the relevant registry key using the following steps :
- Exit Outlook, Microsoft Edge and all Microsoft Office Applications
- Close any remaining error messages or Login prompts
- Open the Registry Editor by typing `regedit` in the Windows Search or open the run and type `regedit.exe`. If you encounter a prompt asking if you want to allow this device to make changes on your device, click “yes”.
- Navigate to this Registry Path in the Registry Editor: `HKEY_CURRENT_USER\Software\Microsoft\Office\16.0\Outlook\AutoDiscover.
- Create a DWORD (32-bit) value for `ExcludeExplicitO365Endpoint` Autodiscover subkey and change the value to `1` to enable it.
- Restart your computer for the changes to take effect.
- Create a new Outlook Profile by going to the control panel. It should not see the Office 365 mailboxes anymore.
Alternatively, you can also add the registry through Command Prompt or PowerShell:
Command Prompt: `reg add HKEY_CURRENT_USER\Software\Microsoft\Office\x.0\Outlook\AutoDiscover /t REG_DWORD /v ExcludeExplicitO365Endpoint /d 1`
PowerShell: `Set-ItemProperty -Path “HKCU:\Software\Microsoft\Office\16.0\Outlook\AutoDiscover” -Name ‘ExcludeExplicitO365Endpoint’ -Value 1 -Type DWORD –Force`
Please note that these instructions are for the following Microsoft Outlook Versions –
- Microsoft Outlook 2016
- Microsoft Outlook 2019
- Microsoft Outlook 365
and may vary for other versions. Always ensure to back up your registry before making any changes. If you’re not comfortable making these changes, please contact the PIP Support Team Helpdesk to make them for you.
Of course, this registry entry is bound to revert with the installation of future security updates, so it is my recommendation to use the registry script above and save it to the desktop for future use.


